
Originally published: January 2026
Getting ready for a residential appraisal in Central Illinois doesn’t need to be stressful. With a bit of planning, you can ensure your home’s value is accurately captured and avoid delays that could slow your sale or refinance.
Most homeowners don’t realize that a few easy steps can make the appointment go much more smoothly.
The Central Illinois real estate market has its quirks. Understanding what appraisers look for in your area helps you get ready the right way.
You actually have more control over the process than you might think. Simple things like organizing paperwork, clearing access to important areas, and knowing what to expect can save time and keep things calm.
This checklist covers what to do before, during, and after your appraisal appointment. You’ll see what to prepare at each stage, which documents to retrieve and how to handle special situations that may arise.

You don’t need to spend hours prepping. A quick check of access points, basic maintenance, and your paperwork can help ensure the appointment goes smoothly and keeps surprises to a minimum.
Make sure the appraiser can access all areas of your property. Unlock gates, clear paths to the attic and basement, and move stuff blocking crawl spaces or mechanical systems.
If they can’t see part of your home, they’ll need to come back another time. That’s just annoying for everyone.
Check that safety features work. Test smoke detectors, carbon monoxide alarms, and security systems. Ensure your plumbing, heating, and cooling systems operate properly.
Gather your paperwork before the appointment. Have ready:
Pick up clutter and knock out minor repairs. Fix leaky faucets, swap out dead bulbs, and take out the trash. These little things show you take care of the place.
Deep cleaning and staging won’t change your appraisal value. Appraisers care about the structure, square footage, and comparable sales in the area. Fresh flowers or candles? Nice, but they don’t matter for value.
Don’t try to sway the appraiser with listing prices from your neighborhood or your own opinion. They use actual comparable properties and data. Hanging over their shoulder or making too many comments just makes things awkward.
Skip expensive cosmetic updates right before the appraisal. New paint or landscaping rarely pays off in the appraisal process. And the time between appraisal and closing is usually too short for big projects anyway.
| Category | Checklist Item | Why It Matters to Value/Accuracy | Done |
| Access | Confirm the appraiser can access all rooms, the garage, attic access, and basement/crawl space. | Missing access can delay the report or prevent verification of features. | ☐ |
| Access | Clear a path to the electrical panel, HVAC, water heater, and main shutoff | An appraiser often must verify key systems and conditions | ☐ |
| Condition | Fix obvious minor defects (leaks, broken fixtures, missing outlet covers, stuck windows) | Visible deferred maintenance can affect condition rating and comparability. | ☐ |
| Safety | Address trip hazards (loose steps/railings) and basic safety issues | Safety/condition issues can trigger lender-required repairs in some cases | ☐ |
| Documentation | Prepare an upgrade list (what, when, cost, contractor, permit, if any) | Helps the appraiser verify contributory value and quality | ☐ |
| Documentation | Gather supporting docs (permits, survey, HOA info, receipts, floor plan if available) | Reduces “unknowns” and improves report accuracy | ☐ |
| Presentation | Ensure home is clean and accessible, not “staged.” | Clutter blocks access; cleanliness supports clear observation | ☐ |
| Pets | Secure pets; note any access constraints | Keeps appointments efficient and safe | ☐ |
| Day-of | Turn on lights; unlock gates/doors; label keys if needed | Faster verification and fewer missed areas | ☐ |
| Communication | Provide a 2–3 minute factual briefing + appraisal packet | Keeps interaction professional and useful without “value pressure.” | ☐ |
Whitsitt & Associates provides experienced residential appraisal guidance and prep tips tailored to your property’s value—ensure you’re ready before the appraiser arrives. Schedule your appointment with us.
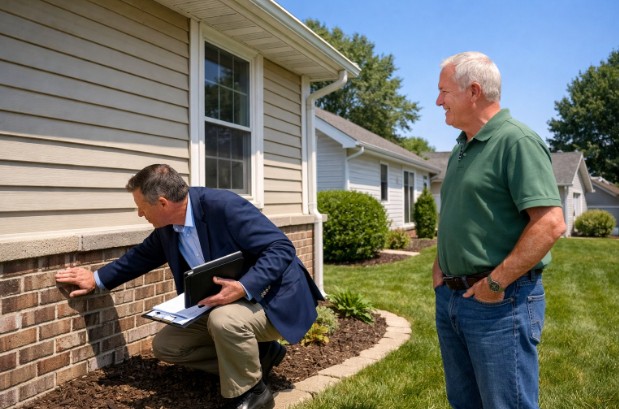
The appraiser follows a set process. They start outside, then head inside, taking measurements and photos while examining features that affect your home’s value.
Knowing what they look for lets you focus on the areas that matter most.
The appraiser starts by walking around outside. They’ll check your roof, siding, foundation, landscaping, and curb appeal. They also note decks, patios, pools, or sheds.
Once inside, they move through each room. They count bedrooms and bathrooms, note layouts, and assess finishes, including flooring and countertops.
The appraiser snaps photos of key areas and measures square footage with a laser or tape measure. During all this, they might ask about updates, the age of big systems, or permit history.
You don’t need to follow them around, but stick close enough to answer questions. The entire visit typically lasts 30 to 60 minutes, depending on your home’s size.
Condition matters a lot. The appraiser checks for maintenance issues, visible damage, outdated systems, and the quality of any upgrades. If your home in Central Illinois looks well cared for, you’ll score higher.
Gross Living Area (GLA) covers all finished, above-grade square footage. They measure carefully—small differences can impact value. Basements usually don’t count toward GLA but might add some value separately.
Comparable sales drive the final number. The appraiser researches recent sales of similar homes in the area to determine your market value. They adjust for differences in size, condition, and features.
Location factors like school districts, nearby amenities, traffic, and neighborhood trends all play a role. These factors affect how your home compares to others.
Breaking up your prep into three stages keeps things manageable. Start repairs early, then focus on presentation and access closer to the appointment.
Walk through your place and spot any minor repairs. Fix leaky faucets, replace dead bulbs, and tighten loose door handles or cabinet pulls.
These fixes show you take care of the place. Gather all service records for major systems, including HVAC, water heaters, and roofs.
Create a folder with receipts for upgrades from the last five years. Include new appliances, flooring, windows, or bathroom work.
Jot down a list of improvements since you bought the home. Note when you finished each one and approximately how much you spent. This helps the appraiser see what sets your property apart from others.
Check your garage door, outside lights, and any electrical outlets that might be out. Test ceiling fans and confirm doors open and close smoothly.
Clear off countertops, tidy closets, and organize storage so the appraiser can see the real space. Ensure they can reach the attic, electrical panel, water heater, and HVAC units without tripping over bins or boxes.
Move storage away from the basement or crawl space walls. Pull furniture back from vents and windows. Ensure all doors open fully, with nothing blocking them.
Test every lock so the appraiser can access all rooms, including utility spaces. Move anything blocking the closet doors. Take bikes or lawn gear out of the way in the garage.
Call the appraiser’s office to confirm the time and ask if they need anything special for access. Double-check they have your phone number in case their schedule shifts.
Turn on every light before the appraiser shows up—even in the basement and attic. Open curtains and blinds to let in daylight. It just makes everything look better and helps them see details.
Secure pets in a separate room, outside, or arrange for them to be elsewhere during the visit. Even the friendliest dog can slow things down. Leave a note if needed so the appraiser knows where the pets are.
Put keys for sheds, detached garages, or storage buildings on the kitchen counter with labels. Record the gate code if your backyard is locked.
Prepare a short note listing your recent upgrades and dates. Keep it brief. You don’t need to hover; just be available for questions as they arise.
| When | Tasks | Time Estimate | Notes |
| 14–7 days out | Identify and complete minor repairs (visible defects, leaks, loose hardware) | 2–6 hours | Prioritize items visible in normal use |
| 14–7 days out | Compile upgrade list (date, scope, cost) + gather receipts | 60–90 mins | Use a one-page summary + backup docs |
| 14–7 days out | Locate permits/warranty/service records (roof/HVAC/plumbing) | 30–60 mins | Helpful for major systems and recent work |
| 72–48 hours out | Declutter to ensure full access (closets that block the attic hatch, mechanical rooms) | 1–3 hours | Appraisers need access more than staging |
| 72–48 hours out | Confirm all utilities on (if property is vacant) | 15–30 mins | If utilities are off, note it in advance |
| 48–24 hours out | Prepare “Appraisal Packet” and leave it in a visible spot | 15 mins | Label clearly: “Appraisal Information.” |
| 48–24 hours out | Secure pets; plan for quiet access during the visit | 10–20 mins | Avoid disruptions during measurement/photos |
| Morning of | Lights on; doors/gates unlocked; keys ready; clear driveway | 10–15 mins | Saves time and prevents missed areas |
| Appointment time | 2–3 minute factual overview + hand packet; then give space | 3–5 mins | Avoid hovering or arguing comps |
Getting your place ready means clearing pathways, fixing obvious issues, and ensuring the appraiser can reach every area they need to. Address visible roof and siding issues, repair broken fixtures inside, and unlock doors to attics, crawl spaces, and utility rooms.
Check your roof for missing or damaged shingles. Look for sagging or worn spots that might get flagged in the report.
Walk around the foundation and check gutters and downspouts. Make sure water drains away from the house and that nothing blocks the flow. Standing water near the foundation? That’s a red flag.
Inspect outdoor steps and handrails for loose boards or rust. Tighten anything that wobbles and replace rotted wood before the visit.
Inspect your siding and trim for cracks, peeling paint, or other damage. Take note of broken windows, torn screens, or bad caulk. These issues can reduce your appraisal value, so fix what you can or at least be aware of them.
Repair leaky faucets and ensure all plumbing functions properly. Check toilets and peek under sinks for water stains or drips.
Test light switches, outlets, and ceiling fans. Replace any dead bulbs and repair flickering fixtures.
Check for water stains on ceilings and walls. Look for cracks in drywall, loose flooring, or damaged trim—anything that needs a quick repair.
Address safety issues such as exposed wiring, missing smoke detector covers, or broken stair rails. Clean up any visible mold or mildew in bathrooms or basements.
These health and safety issues can significantly impact your appraisal outcome and may require professional assistance before the appointment.
Unlock the attic hatches and pull-down stairs so the appraiser can access the overhead spaces. Confirm the attic lights work, and move any boxes or storage that block entry points.
Open the basement doors before the appointment. Keep stairways clear and well-lit.
Move clutter away from furnaces, water heaters, and electrical panels. The appraiser needs easy access to these areas.
Hand over keys or combinations for locked outbuildings, sheds, and detached garages that count toward your property value. They’ll need to measure and photograph those structures.
Clear a path to your HVAC system, water heater, main electrical panel, and shut-off valves. Appraisers need to verify these systems and check their condition.
If you block utility areas, it can delay the appointment or leave the report incomplete.
Whitsitt & Associates helps you prepare for your appraisal with proven checklists, documentation guidance, and local experience—get your residential property ready with confidence today. Schedule your appraisal appointment now.
Creating an organized appraisal packet helps appraisers work more quickly and assess your home’s value more accurately. If you gather the right documents before the appraiser arrives, you reduce delays and ensure they don’t miss your upgrades.
Write a detailed list of every improvement you’ve made to your property. Include when you finished each project, what you did, and how much you spent.
Start with major projects such as kitchen remodels, bathroom renovations, new HVAC systems, roof replacements, and finished basements. Don’t forget more minor updates—maybe new windows, fresh flooring, or a new deck.
For each improvement, jot down:
Keep receipts, invoices, and before-and-after photos with your list. Appraisers can’t give you credit for improvements they don’t know about, so this paperwork really helps back up your case for a higher value.
Gather property documents that show the details about your home. These help the appraiser verify information and identify features they might miss during a quick walkthrough.
Documents to include:
If you live in a planned community, include info on HOA amenities such as pools, fitness centers, or clubhouses. These details add value but might not be obvious during the visit.
Recent utility bills help the appraiser understand operating costs, which buyers definitely think about. Store everything in a folder or binder to hand over to the appraiser upon arrival.
| Document / Info | Where to Find It | When It Matters Most | Included |
| One-page property fact sheet (beds/baths, GLA if known, lot size, unique features) | Owner notes / prior listing | Keeps key facts consistent and easy to verify | ☐ |
| Upgrade & repair log (date, scope, cost, contractor) | Receipts/invoices | Supports quality/condition adjustments and credibility | ☐ |
| Major system updates: roof, HVAC, windows, plumbing/electrical docs | Contractor receipts/warranties | High-impact items in condition/quality evaluation | ☐ |
| Permits and inspection sign-offs (if applicable) | City/county records | Helps verify additions, conversions, and major work | ☐ |
| Survey/plat (or legal description if needed) | Closing documents | Helpful for lot/site issues, easements, boundaries | ☐ |
| HOA docs (fees, amenities, restrictions) | HOA portal / welcome packet | Impacts marketability and monthly costs | ☐ |
| Floor plan or prior listing measurements (if available) | Prior MLS, builder, personal plan | Not a substitute for appraiser measurement, but helpful context | ☐ |
| Recent utility bills (optional) | Utility accounts | Occasionally useful for unusual properties | ☐ |
| List of included items (appliances, fixtures) | Seller notes | Clarifies what is conveyed with the property | ☐ |
| For unique properties: info on outbuildings, acreage features, well/septic | Owner records | Helps with rural comps and feature verification | ☐ |
Your interaction with the appraiser should be brief, helpful, and focused on the facts. You want to offer them information they need without wasting time or trying to sway their judgment.
When the appraiser arrives, greet them professionally and keep your introduction under three minutes.
Let them know which doors are unlocked, where the light switches are, and whether any areas require special access, such as attic stairs or crawl spaces.
Mention only factual updates that aren’t in public records. Maybe you put on a new roof in 2023, replaced the HVAC in 2024, or finished a permitted addition last year—share the dates and whether you pulled permits.
If you know recent sales in your neighborhood, provide a short list of addresses. Don’t suggest what those sales mean for your home’s value, though.
Let them know you’re available by phone if any questions arise, and then give them space. This approach allows professional appraisers in Central Illinois to work independently.
Don’t tell the appraiser what you think your home should be worth, or what you need it to appraise for.
Saying things like “I need this to come in at $350,000” or “My neighbor’s house sold for more” creates ethical headaches for them. They must remain unbiased, and those comments might end up in their report.
It’s best not to follow the appraiser room to room. That makes their job harder and can make you appear to be trying to influence them.
Skip the long stories about each room or your renovation journey unless they ask. The appraiser knows what to document and doesn’t need to hear about your decorating choices or plans.
What not to do:
Government-backed loans impose additional safety requirements on appraisals. Older homes and rural properties in Central Illinois need a different kind of prep. Additions and outbuildings require more documentation than most urban homes.
FHA and USDA appraisals are subject to stricter safety and livability standards than conventional loans.
If your house was built before 1978, the appraiser will flag peeling paint as a potential lead hazard. Ensure all handrails on stairs with four or more steps are secure.
Missing or broken windows will cause you trouble. The appraiser checks that every appliance included in the sale is operational, not just that it’s there.
Your water heater requires a temperature and pressure relief valve with proper drainage. USDA loans require the property to be in a rural area and to meet additional standards.
Your well water needs test results dated within 90 days. Septic systems need proof of proper function and maintenance.
Common FHA/USDA red flags:
VA appraisals protect service members from buying homes with major defects or safety issues. Your property must meet Minimum Property Requirements that go beyond standard appraisal requirements.
The appraiser checks for wood-destroying insects and usually requires a pest inspection. You need clear access to attics, crawl spaces, and mechanical systems.
Your roof should have at least two years of life left, or the appraiser will require a replacement. All mechanical systems—heating, cooling, plumbing—must work properly.
The VA doesn’t allow “subject to” appraisals in which you make repairs after closing. You must complete the required repairs before the loan closes.
Minor cosmetic issues won’t stop your appraisal, but safety problems will. The appraiser will note peeling paint, damaged flooring, or missing handrails in their report.
If you’re a veteran, expect the process to take slightly longer than a conventional appraisal due to the additional checks.
Central Illinois homes usually have unfinished basements. Appraisers need to fully enter these basements.
Clear away any stored stuff from furnaces, water heaters, and electrical panels. Make sure your sump pump’s easy to see and actually works—most folks around here rely on them.
If you have unpermitted additions, expect valuation issues in McLean, Tazewell, and Woodford counties. Try to provide any building permits or paperwork that show when you built those additions.
Room additions without permits probably won’t count toward your square footage. The appraiser will still measure and photograph these spaces, but they’ll keep them separate.
Pole barns, detached garages, and outbuildings can add value, but only if the appraiser can get inside. Unlock everything and get it ready for a look.
Rural homes take longer to appraise. Comparable sales are scarce, so appraisers have to look farther out.
Whitsitt & Associates offers trusted residential appraisal services in Central Illinois with thorough reports and fast turnaround—maximize accuracy and confidence before your next move. Contact us for your appraisal today.
How do I prepare for a residential appraisal appointment?
Prepare by ensuring full access (attic, basement, utilities), fixing obvious safety/condition issues, and compiling a simple upgrade list with dates and receipts. The goal is fast verification and accurate condition reporting during a short on-site visit.
What documents should I give the appraiser?
Provide a one-page property fact sheet, a dated list of improvements with costs, permits (if any), and major system records (roof/HVAC/windows). These items help the appraiser confirm features and support adjustments without guesswork.
Should I make repairs before the appraisal?
Yes—address visible, functional problems (leaks, broken fixtures, missing handrails, peeling paint where required). Appraisers don’t expect renovations, but deferred maintenance can lower the home’s condition rating and may trigger lender repair requirements.
Does cleaning or staging increase appraisal value?
Cleaning and light decluttering usually won’t directly increase value, but they improve access and help the appraiser document condition with clear photos. Staging is less important than ensuring every area and utility space is easy to inspect.
How long does a home appraisal appointment take?
Most onsite appraisal visits take about 30 minutes to a few hours, depending on the home’s size and complexity. The overall process can take days to weeks because analysis, comparable research, and report writing happen after the visit.
What do appraisers look for during the visit?
Appraisers typically evaluate the home’s condition, size and layout, quality and updates, site/neighborhood factors, and its comparison to recent nearby sales. They document features with measurements and photos, then reconcile everything into a market-supported value.
What can I do if the appraisal reflects a lower value than you’d hoped for?
Start by checking the report for factual errors (square footage, features, upgrades). Then ask your lender about their Reconsideration of Value (ROV) process and submit better comps or documentation. If needed, renegotiate or explore other options.
